How to Install Sitecore 9
Table of Contents
- Introduction
- Download Sitecore 9 Package
- IIS Setup
- Install SQL Server 2016 SP1
- Install Solr 6.6.2
- Setup Windows Service for Solr
- Enable SSL for Solr
- Run Sitecore Installation Framework
- Conclusion
Introduction
Sitecore 9's installation is a little different than Sitecore 8. It is recommended to use the Sitecore Installation Framework, which lets you install the solution with PowerShell. There are lots of sites and videos that describe how to set up Sitecore 9 already. This blog will be a quick version or set of notes on how to set up Sitecore 9. If you want to watch a short YouTube video, I recommend watching Install Sitecore 9. The total is about 15 minutes; it starts from setting up IIS, SQL Server 2016 SP1, SQL Server Data Tools 2015, Solr 6.6.2, and using the Sitecore Installation Framework. I wish I could have watched this video before I started installing Sitecore 9 because I had made a few common mistakes.
The following section will focus on how to set up the local development environment for Sitecore 9.
Download Sitecore 9 Package
First, go to dev.sitecore.net to download the package for XP Single.

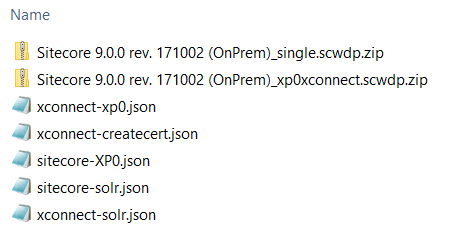
After extracting the zip file, you'll see the following files. You will probably need to modify the _.json files, but you won't have to touch the _.zip files.
-
Sitecore 9.0.0 rev. 171002 (OnPrem)_single.scwdp.zip
-
Sitecore 9.0.0 rev. 171002 (OnPrem)_xp0xconnect.scwdp.zip
-
xconnect-xp0.json
-
xconnect-createcert.json
-
sitecore-XP0.json
-
sitecore-solr.json
-
xconnect-solr.json
IIS Setup
Make sure you have IIS installed on your local machine. The following is a sample setting for your reference.

Install SQL Server 2016 SP1
You can go to this link to download a free version of SQL Server 2016. In this blog, I downloaded the Developer version.

SQL Server 2016 Settings
There are a few things you need to modify for SQL Server 2016.
-
Change Server Properties' Server authentication from Windows Authentication mode to SQL Server and Windows Authentication mode.
- 
Change sa from Login Disabled to Enabled.
- 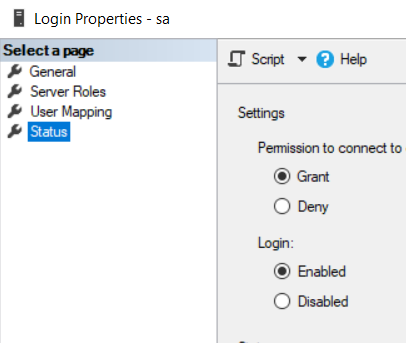
Change the sa password.
- 
Install SQL Server Management Studio
In this blog, I installed SQL Server Management Studio 17.3. You can download it from this link.
Install Web Platform Installer Components
Install SQL Server Data Tools 2015
Install Solr 6.6.2
For Sitecore 9.0.0 rev. 171002, it's better to use the Solr 6.x version. I tried using the 7.x version of Solr but ran into some issues when trying to create a module on Solr.
You can download Solr 6.6.2 from here.

Setup Windows Service for Solr
Download NSSM.

Add NSSM to System Variables' Path.
Since I put my NSSM at the following location, add the path as
C:\Files\nssm-2.24\win64. Once you add the executable path to System
Variables, refresh the command line, and then you can use the NSSM command on the Command
Prompt. Now, type nssm install solr. Enter information as
follows:
-
Path: C:\solr-6.6.2\bin\solr.cmd
-
Startup directory: C:\solr-6.6.2\bin
-
Arguments: start -f -p 8983
-
Service name: solr

Enable SSL for Solr
You can read Solr's documentation to set up SSL, but I recommend using this blog — PowerShell to enable SSL for Solr — as it is much easier. You'll have to change the Java keytool.exe path to the location on your PC. The following is the script from "Quickly add SSL to Solr" from kamsar.net.
param(
	[string]$KeystoreFile = 'solr-ssl.keystore.jks',
	[string]$KeystorePassword = 'secret',
	[string]$SolrDomain = 'localhost',
	[switch]$Clobber
)

$ErrorActionPreference = 'Stop'

### PARAM VALIDATION
if($KeystorePassword -ne 'secret') {
	Write-Error 'The keystore password must be "secret", because Solr apparently ignores the parameter'
}

if((Test-Path $KeystoreFile)) {
	if($Clobber) {
		Write-Host "Removing $KeystoreFile..."
		Remove-Item $KeystoreFile
	} else {
		$KeystorePath = Resolve-Path $KeystoreFile
		Write-Error "Keystore file $KeystorePath already existed. To regenerate it, pass -Clobber."
	}
}

$P12Path = [IO.Path]::ChangeExtension($KeystoreFile, 'p12')
if((Test-Path $P12Path)) {
	if($Clobber) {
		Write-Host "Removing $P12Path..."
		Remove-Item $P12Path
	} else {
		$P12Path = Resolve-Path $P12Path
		Write-Error "Keystore file $P12Path already existed. To regenerate it, pass -Clobber."
	}
}

try {
	$keytool = (Get-Command 'C:\Program Files\Java\jdk1.8.0_131\bin\keytool.exe').Source
} catch {
	$keytool = Read-Host "keytool.exe not on path. Enter path to keytool (found in JRE bin folder)"

	if([string]::IsNullOrEmpty($keytool) -or -not (Test-Path $keytool)) {
		Write-Error "Keytool path was invalid."
	}
}

### DOING STUFF

Write-Host ''
Write-Host 'Generating JKS keystore...'
& $keytool -genkeypair -alias solr-ssl -keyalg RSA -keysize 2048 -keypass $KeystorePassword -storepass $KeystorePassword -validity 9999 -keystore $KeystoreFile -ext SAN=DNS:$SolrDomain,IP:127.0.0.1 -dname "CN=$SolrDomain, OU=Organizational Unit, O=Organization, L=Location, ST=State, C=Country"

Write-Host ''
Write-Host 'Generating .p12 to import to Windows...'
& $keytool -importkeystore -srckeystore $KeystoreFile -destkeystore $P12Path -srcstoretype jks -deststoretype pkcs12 -srcstorepass $KeystorePassword -deststorepass $KeystorePassword

Write-Host ''
Write-Host 'Trusting generated SSL certificate...'
$secureStringKeystorePassword = ConvertTo-SecureString -String $KeystorePassword -Force -AsPlainText
$root = Import-PfxCertificate -FilePath $P12Path -Password $secureStringKeystorePassword -CertStoreLocation Cert:\LocalMachine\Root
Write-Host 'SSL certificate is now locally trusted. (added as root CA)'

Write-Host ''
Write-Host '########## NEXT STEPS ##########' -ForegroundColor Green
Write-Host ''
Write-Host '1. Copy your keystore to $SOLR_HOME\server\etc (MUST be here)' -ForegroundColor Green

if(-not $KeystoreFile.EndsWith('solr-ssl.keystore.jks')) {
	Write-Warning 'Your keystore file is not named "solr-ssl.keystore.jks"'
	Write-Warning 'Solr requires this exact name, so make sure to rename it before use.'
}

$KeystorePath = Resolve-Path $KeystoreFile
Write-Host ''
Write-Host '2. Add the following lines to your solr.in.cmd:' -ForegroundColor Green
Write-Host ''
Write-Host "set SOLR_SSL_KEY_STORE=etc/solr-ssl.keystore.jks" -ForegroundColor Yellow
Write-Host "set SOLR_SSL_KEY_STORE_PASSWORD=$KeystorePassword" -ForegroundColor Yellow
Write-Host "set SOLR_SSL_TRUST_STORE=etc/solr-ssl.keystore.jks" -ForegroundColor Yellow
Write-Host "set SOLR_SSL_TRUST_STORE_PASSWORD=$KeystorePassword" -ForegroundColor Yellow
Write-Host ''
Write-Host 'Done!'
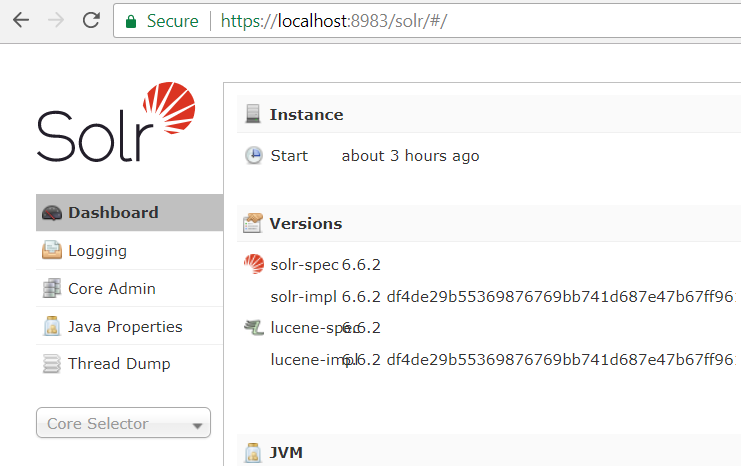
Once you install the service and enable SSL on Solr, check the Solr page and make sure the page loads with HTTPS. If the page is not loading correctly, you'll have to find and fix the issue.
Run Sitecore Installation Framework
Verify the following before you run the Sitecore Installation Framework:
-
Installed IIS
-
Installed SQL Server 2016 SP1
-
Configured SQL Server 2016
-
Installed Solr and enabled SSL on Solr

install.ps1
Import-Module SitecoreFundamentals
Import-Module SitecoreInstallFramework

#define parameters
$prefix = "sitecore_900"
$XConnectCollectionService = "$prefix.xconnect"
$sitecoreSiteName = "$prefix.local"
$SolrUrl = "https://localhost:8983/solr"
$SolrRoot = "C:\solr-6.6.2"
$SolrService = "solr"
$SqlServer = "Your local sql server name"
$SqlAdminUser = "sa"
$SqlAdminPassword = "your sa password"
$SqlAccountUser = "$prefix"
$SqlAccountPassword = "Pa##w0rd"
$FilesRoot = "C:\FolderContainsAllSitecoreFileForInstall"

#install client certificate for xconnect
$certParams =
@{
    Path = "$FilesRoot\xconnect-createcert.json"
    CertificateName = "$prefix.xconnect_client"
}
Install-SitecoreConfiguration @certParams -Verbose


#install solr cores for xdb
$solrParams =
@{
    Path = "$FilesRoot\xconnect-solr.json"
    SolrUrl = $SolrUrl
    SolrRoot = $SolrRoot
    SolrService = $SolrService
    CorePrefix = $prefix
}
Install-SitecoreConfiguration @solrParams -Verbose

#deploy xconnect instance
$xconnectParams =
@{
    Path = "$FilesRoot\xconnect-xp0.json"
    Package = "$FilesRoot\Sitecore 9.0.0 rev. 171002 (OnPrem)_xp0xconnect.scwdp.zip"
    LicenseFile = "$FilesRoot\license.xml"
    Sitename = $XConnectCollectionService
    XConnectCert = $certParams.CertificateName
    SqlDbPrefix = $prefix
    SqlServer = $SqlServer
    SqlAdminUser = $SqlAdminUser
    SqlAdminPassword = $SqlAdminPassword
    SolrCorePrefix = $prefix
    SolrURL = $SolrUrl
    SqlMarketingAutomationUser = $SqlAccountUser
    SqlMarketingAutomationPassword = $SqlAccountPassword
    SqlReferenceDataUser = $SqlAccountUser
    SqlReferenceDataPassword = $SqlAccountPassword
    SqlProcessingPoolsUser = $SqlAccountUser
    SqlProcessingPoolsPassword = $SqlAccountPassword
}
Install-SitecoreConfiguration @xconnectParams -Verbose

#install solr cores for sitecore
$solrParams =
@{
    Path = "$FilesRoot\sitecore-solr.json"
    SolrUrl = $SolrUrl
    SolrRoot = $SolrRoot
    SolrService = $SolrService
    CorePrefix = $prefix
}
Install-SitecoreConfiguration @solrParams -Verbose

#install sitecore instance
$sitecoreParams =
@{
    Path = "$FilesRoot\sitecore-XP0.json"
    Package = "$FilesRoot\Sitecore 9.0.0 rev. 171002 (OnPrem)_single.scwdp.zip"
    LicenseFile = "$FilesRoot\license.xml"
    SqlDbPrefix = $prefix
    SqlServer = $SqlServer
    SqlAdminUser = $SqlAdminUser
    SqlAdminPassword = $SqlAdminPassword
    SolrCorePrefix = $prefix
    SolrUrl = $SolrUrl
    XConnectCert = $certParams.CertificateName
    Sitename = $sitecoreSiteName
    XConnectCollectionService = "https://$XConnectCollectionService"
    SqlCoreUser = $SqlAccountUser
    SqlCorePassword = $SqlAccountPassword
    SqlMasterUser = $SqlAccountUser
    SqlMasterPassword = $SqlAccountPassword
    SqlWebUser = $SqlAccountUser
    SqlWebPassword = $SqlAccountPassword
    SqlFormsUser = $SqlAccountUser
    SqlFormsPassword = $SqlAccountPassword
    SqlProcessingTasksUser = $SqlAccountUser
    SqlProcessingTasksPassword = $SqlAccountPassword
    SqlReportingUser = $SqlAccountUser
    SqlReportingPassword = $SqlAccountPassword
    SqlMarketingAutomationUser = $SqlAccountUser
    SqlMarketingAutomationPassword = $SqlAccountPassword
    SqlReferenceDataUser = $SqlAccountUser
    SqlReferenceDataPassword = $SqlAccountPassword
    SqlProcessingPoolsUser = $SqlAccountUser
    SqlProcessingPoolsPassword = $SqlAccountPassword
}
Install-SitecoreConfiguration @sitecoreParams -Verbose
Run install.ps1.
If everything is correct, you should see your site with the prefix.

Conclusion
Compared to how Sitecore 8 was set up via SIM, using PowerShell is a little more complicated since there are things that have to be set up beforehand. That can lead to some mistakes. So if you install Sitecore 9, I recommend the following:
-
Don't use Solr 7.x; use 6.x instead. For example, this blog uses 6.6.2.
-
Don't use SQL Server 2014 or SQL Server 2014 SP2 if possible, because some features don't work. It's better to use SQL Server 2016.
-
If you're new, watch this video before trying.
References
-
Sitecore 9 download link
-
kamsar.net about quickly setting up SSL on Solr
-
YouTube video about how to install Sitecore 9
-
Download Solr
-
Download SQL Server Data Tools (SSDT)
-
Download NSSM
-
Sitecore dev link for sample Sitecore 9 script