How to Build Your First Vertex AI Model Using AutoML
Table of Contents
- Introduction
- Choose Your Dataset
- Building the Initial Model
- Automating with Vertex AI Pipelines
- Deploying for Predictions
- Cost & Strategy Comparison
- Conclusion
Introduction
In this post, I explore the end-to-end workflow of GCP Vertex AI using a housing dataset. We'll walk through the entire process—from uploading the data and using AutoML to generate an API, to analyzing the final execution flow. My goal is to establish an entire workflow and to understand the costs involved in this tutorial.
Choose Data Science Problem
Since the purpose of this is to try Vertex AI AutoML with any dataset, I decided to solve a price prediction problem using data science. This is a classic linear regression task, making it the perfect way to test out Vertex AI without overcomplicating things. I wanted to start with a manageable dataset to see how the platform handles the end-to-end process.
Choose Your Dataset
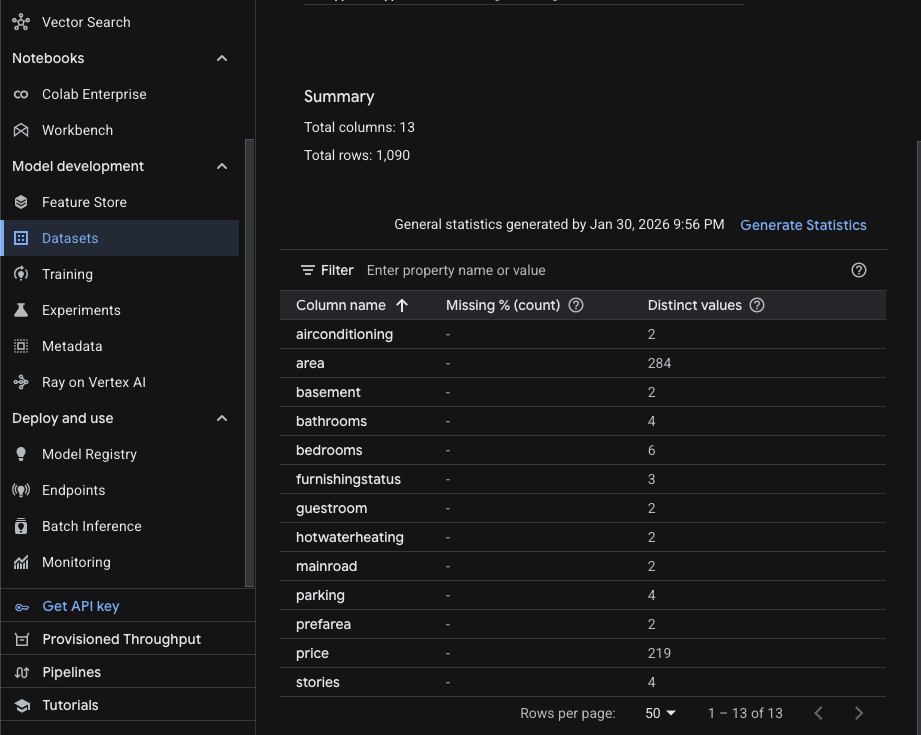
Since the goal is to test Vertex AI, I chose the simplest dataset possible. You can find it here; I’ve augmented about half of the data to meet the Vertex AI minimum requirement of 1,000 rows.
Below is the sample data from this dataset. The dataset starts with price, followed by other features: area, bedrooms, bathrooms, etc. Price is the target value here. What we'd like to do with this data is use features such as area, bedrooms, and bathrooms to predict the target value price.
price,area,bedrooms,bathrooms,stories,mainroad,guestroom,basement,hotwaterheating,airconditioning,parking,prefarea,furnishingstatus
13300000,7420,4,2,3,yes,no,no,no,yes,2,yes,furnished
12250000,8960,4,4,4,yes,no,no,no,yes,3,no,furnished
12250000,9960,3,2,2,yes,no,yes,no,no,2,yes,semi-furnished
...
GCP AutoML
The rest of the steps involve using this dataset to build, train, and deploy a model on the Vertex AI platform. So what's AutoML?
Without AutoML, a typical ML process involves loading the dataset with Python, performing EDA to understand the data and its correlations, then using feature engineering to select the right features. After that, you might do cross-validation to train and evaluate the model and find the most efficient approach for better predictions.
AutoML does all of that for you, so you don't have to worry about the best practices for building a model. It's suitable when you're trying to build your first ML model and want to skip the low-level details.
Building the Initial Model
For tabular data (rows and columns), AutoML Tabular is the most efficient starting point. It handles complex math and feature scaling automatically.
1.1 Data Preparation
- EDA: Perform Exploratory Data Analysis to understand distributions.
- Storage: Format your data into a CSV and upload it to a Google Cloud Storage (GCS) bucket.
1.2 Create Dataset in Vertex AI
Navigate to the Vertex AI console and create a new dataset. Select the Tabular type and the Regression/Classification option.
What is "Tabular" in Vertex AI? It refers to structured data organized in rows and columns. It is the standard format for predicting numerical values (Regression) or categories (Classification).
1.3 Train the Model
- Objective: Select Regression (since price is a continuous numerical value).
- Target Column: Select the column representing
price. - Budget: Vertex AI requires a minimum of 1 node hour. For datasets under 100k rows, 1-3 hours is usually sufficient.
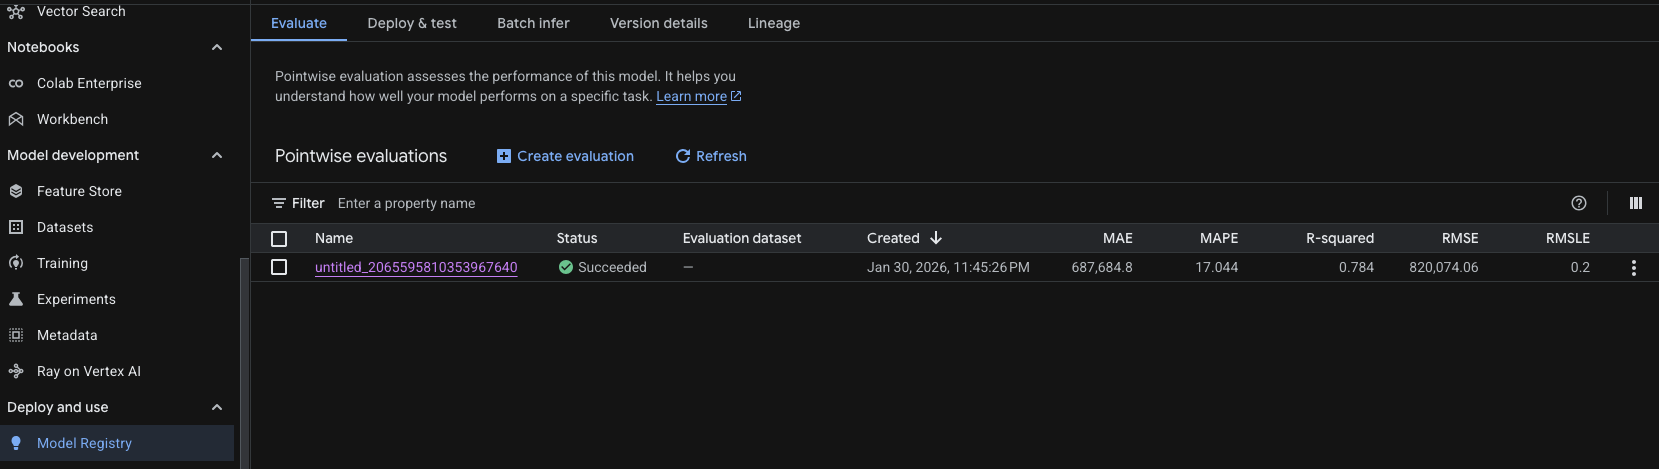
As you can see above, the model was successfully trained and now has a version with results. Here is what each metric means for the model we just trained with AutoML.
| Metric | Value | What it's telling us |
|---|---|---|
| Name | untitled_2065595810353967640 | The unique identifier for this training run. |
| Status | Succeeded | The model training completed without errors. |
| Created | Jan 30, 2026 | The timestamp of when the evaluation was finalized. |
| MAE | 687,684.8 | The average "raw" error; your predictions are off by this amount on average. |
| MAPE | 17.044% | The relative error; predictions are typically off by about 17% of the actual value. |
| R-squared | 0.784 | The "goodness of fit"; your model explains ~78% of the data's behavior. |
| RMSE | 820,074.06 | Penalizes larger errors more than MAE; suggests some significant outliers exist. |
| RMSLE | 0.2 | Measures the ratio of error; lower values mean the model handles scales well. |
Deploying for Predictions
Once trained, you can consume the model in two ways:
3.1 Real-Time Predictions
Best for "instant" price suggestions in an app.
- Deploy to Endpoint: Host the model on a Vertex AI Endpoint.
- Request: Use the Vertex AI SDK (Python, Node.js, etc.) to send feature data.
# Sample snippet for real-time prediction
from google.cloud import aiplatform

endpoint = aiplatform.Endpoint(endpoint_name="PROJECT_ID/locations/REGION/endpoints/ENDPOINT_ID")
prediction = endpoint.predict(instances=[{"feature_1": "value", "feature_2": 10}])
print(prediction)
3.2 Batch Predictions
Best for "offline" processing when you have many predictions to make at once.
- Input: Prepare a CSV file with all instances and upload to GCS.
- Batch Job: Submit a batch prediction job via the Vertex AI console.
- Output: Results are written back to GCS in JSON format.
# Sample snippet for batch prediction
from google.cloud import aiplatform

model = aiplatform.Model(model_name="PROJECT_ID/locations/REGION/models/MODEL_ID")
batch_prediction_job = model.batch_predict(
    job_display_name="housing-price-batch-predict",
    gcs_source_uris=["gs://your-bucket/input.csv"],
    gcs_destination_output_uri_prefix="gs://your-bucket/predictions/"
)
batch_prediction_job.result()
Cost & Strategy Comparison
Understanding Vertex AI Pricing
-
Training Cost (AutoML Tabular)
- Charged per node-hour. A typical small model trains in 1–3 hours on a single node.
- For free tier: Google offers $300 credit over 90 days. A 2-hour training job costs roughly $10–$15.
- Equation:
Cost = Node-Hours × $5–$8/hour
-
Endpoint Hosting Cost
- Once deployed, you pay for compute resources even if idle.
- A single
n1-standard-4machine costs ~$20/day. - Best practice: Enable autoscaling or manually scale to 0 when not in use.
-
Batch Predictions
- Cheaper than real-time endpoints for bulk processing.
- Charged per prediction (roughly $0.015 per 1,000 predictions).
- Best for: Nightly or weekly report generation.
-
Data Storage (GCS)
- Minimal cost for CSV files. First 5 GB is free on free tier.
Cost Breakdown for This Example
| Component | Hours/Calls | Cost |
|---|---|---|
| Training (AutoML) | 2 | $10–$15 |
| Model Deployment | 24 hours (1 day) | ~$20 |
| 10,000 Batch Predictions | 10k | ~$0.15 |
| GCS Storage | CSV only | Free (under 5GB) |
| Total (1-day project) | — | ~$30–$35 |
Strategy: How to Minimize Costs
- Use Free Tier Credits: Start with the $300 90-day free tier credit. Train and experiment aggressively.
- Turn Off Endpoints When Not Testing: A deployed endpoint costs money even if unused. Delete it after testing.
- Prefer Batch Predictions: For infrequent use cases, batch predictions are 10–100x cheaper than maintaining an endpoint.
- Monitor with Cloud Budget Alerts: Set a budget of $50/month and receive email alerts when you approach the limit.
Conclusion
Vertex AI with AutoML Tabular is an excellent entry point for anyone wanting to explore machine learning on GCP without deep expertise in data science or model architecture. The platform handles the heavy lifting—feature engineering, hyperparameter tuning, and deployment—so you can focus on the business problem.
Key Takeaways:
- Simple data + AutoML = Fast results. A housing price prediction model takes just 2–3 hours to train and deploy.
- Costs are transparent and manageable. With the free tier credit, you can build, train, and deploy multiple models risk-free.
- Automate retraining with Pipelines. Once your workflow is validated, use Kubeflow Pipelines to keep your model fresh as new data arrives.
- Choose the right inference method. Real-time endpoints are ideal for interactive apps; batch predictions suit reporting workflows.
By starting with the free tier and understanding the cost model upfront, you're well-positioned to confidently scale to production workloads.