How to Use SnowSQL to Interact with Snowflake
Table of Contents
- Introduction
- Create a Snowflake User
- Install SnowSQL
- Log in with SnowSQL
- Import Data into Snowflake by Using SnowSQL
- Copy Data into the Snowflake Table
- Query Data via SnowSQL
- Remove Database and Data Warehouse
- Exit
- Conclusion
Introduction
Snowflake is designed for scalability with big data. This blog shows how to get started with Snowflake using SnowSQL, the command line client for interacting with Snowflake.
Create a Snowflake User
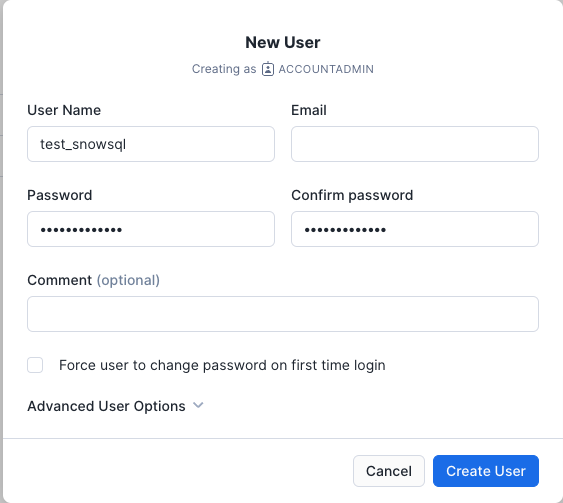
Once you create a 30-day trial account, the role should be able to create a new user. For learning purposes, you can log in to the trial account, go to Admin > Users & Roles, and click User to create a new user.
The sample data here is from the Snowflake documentation.
Install SnowSQL
Follow the official documentation to download SnowSQL. This blog's tutorial is running on macOS; you can choose a different OS per your environment here:
https://docs.snowflake.com/en/user-guide/snowsql-install-config#installing-snowsql-on-macos-using-the-installer
Once SnowSQL is installed, try running the steps below to connect to Snowflake with SnowSQL.
snowsql -a <account_name> -u <login_name>
In case you have issues running snowsql on macOS, after installing snowsql, try the command below in the terminal.
/Applications/SnowSQL.app/Contents/MacOs/snowsql
If this still doesn't work, try updating Brew or reinstalling Brew. Once Brew is updated, try again with this command to install snowsql via Brew:
brew install --cask snowflake-snowsql
Log in with SnowSQL
Start connecting to Snowflake with SnowSQL by typing the command below. The account_identifier is the one you received in the email — the * part of https://***.snowflakecomputing.com.
snowsql -a <account_identifier> -u <user_name>
Once you successfully start a terminal window with SnowSQL, you can begin typing SQL commands for DML or DDL.
This command will create a database called sf_test. By default, this will be created under the public schema.
CREATE or REPLACE DATABASE sf_test;
This command will then create a table called emp_basic.
create or replace table emp_basic (
first_name STRING ,
last_name STRING ,
email STRING ,
streetaddress STRING ,
city STRING ,
start_date DATE
);
This command will create a warehouse.
CREATE OR REPLACE WAREHOUSE sf_test_wh WITH
   WAREHOUSE_SIZE='X-SMALL'
   AUTO_SUSPEND = 180
   AUTO_RESUME = TRUE
   INITIALLY_SUSPENDED=TRUE;
Import Data into Snowflake by Using SnowSQL
Below is the command to upload the employees01.csv file into the Snowflake table:
PUT file:///Users/employees01.csv @sf_test.public.%emp_basic;
You can also type this to check the uploaded files:
LIST @sf_test.public.%emp_basic;
Copy Data into the Snowflake Table
COPY INTO emp_basic
  FROM @%emp_basic
  FILE_FORMAT = (type = csv field_optionally_enclosed_by='"')
  PATTERN = '.*employees0[1-5].csv.gz'
  ON_ERROR = 'skip_file';
Query Data via SnowSQL
Now we can run regular SQL syntax to query data.
select * from emp_basic;
-- or
select count(*) from emp_basic;
-- or
select city, count(*) from EMP_BASIC group by city order by city;
-- or
insert into EMP_BASIC values ('dd', 'yy', 'ddyy@ddyy.com', 'street', 'll', '2022-02-01');
Remove Database and Data Warehouse
Once we finish our tutorial, we can run the commands below to remove the database and warehouse.
drop database if exists sf_test;
drop WAREHOUSE if exists sf_test_wh;
Exit
To exit SnowSQL, type !exit to exit the terminal.
Conclusion
If you go back to the Snowflake console, you shouldn't see the database or warehouse anymore. Using SnowSQL is a very straightforward way to interact with Snowflake by typing SQL syntax from your terminal.