How to Setup and Customize Swagger with ASP.NET MVC
This walkthrough turtorial is about how to setup Swagger with ASP.NET MVC API by using Visual Studio 2015, also provide steps of how to customize the swagger UI.
What's Swagger?
Swagger could provide more rich documents for your API, but that's not it, it provides how to design tests and documentation about your API. Although, this blog just focuses on how to set up Swagger UI on Visual Studio 2015's ASP.NET API project. ASP.NET MVC also has a Web API Helper page but unlike Swagger, which is more powerful with client generation, discoverable, and more developer support.
This blog will show how to use Swagger to ASP.NET MVC API project and provide a list of how to.
With a Swagger-enabled API, you get interactive documentation, client SDK generation and discoverability.
Install-Package Swashbuckle
Following are few information relative with Swagger.
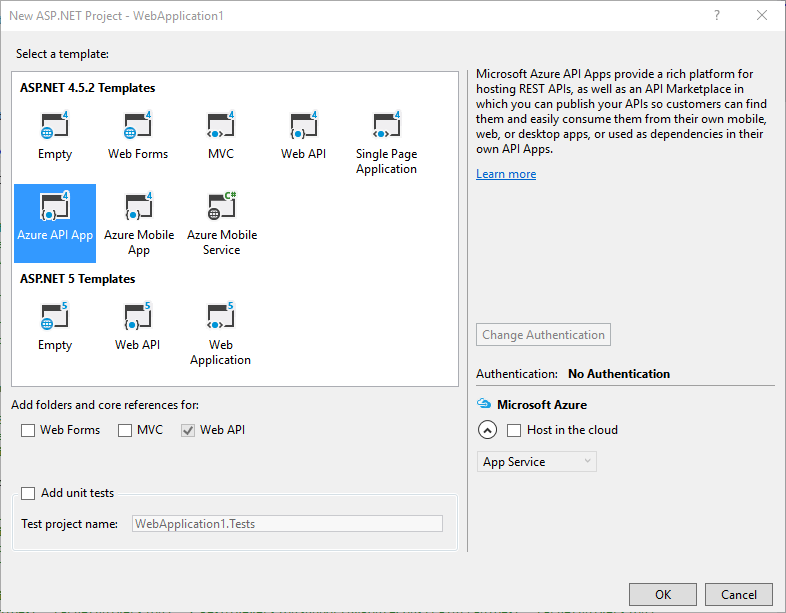
Use Azure API App template with Swagger
You can use Swagger with Visual Studio 2015, ASP.NET 4.5.2 Templates. Once you use Visual Studio and create a web application by template Azure API App, at your solution you should see the following Swagger at the package file.
You will find the NuGet library Swashbuckle, that .NET version of
Swagger, if you want to use the latest NuGet version. You can use NuGet to
uninstall the package and install the latest NuGet package again.

SwaggerConfig and EnableSwaggerUi and basic
configuration
After installing Swashbuckle, you will see a SwaggerConfig under your
App_Start folder. This SwaggerConfig is the start point to enable
Swagger. At the following, if you have already contained, then your setup is
done. We should see the API document written by Swagger.
[assembly: PreApplicationStartMethod(typeof(SwaggerConfig), "Register")]

namespace WebApplication1
{
    public class SwaggerConfig
    {
        public static void Register()
        {
            var thisAssembly = typeof(SwaggerConfig).Assembly;

            GlobalConfiguration.Configuration

                .EnableSwagger(c =>
                    // {...
                    // this will enable swagger UI
                .EnableSwaggerUi(c =>
Build the solution and check the URL
{yoururl}/swagger or {yoururl/swagger/ui/index
Boom!!!, you should be able to see the following swagger UI document page. I
have two Web APIs, TestController and
ValuesController. As you can see, it contains a search feature
and you can try it out!!?


However, I also got the following question when I first see these pages generated by Swagger.
- Can I change this API document's UI, including logo, stylesheet?
- Can I add javascript to this?
- Can I change the URL instead of /swagger?
- Can I add my own page to this auto-generated page?
- Can I make certain Web API does not show?
- Can I turn the swagger's API documents off at production, but only in development?
I might not cover all these questions I have in my mind but will give them a try and list them here.
Can I Use a customized stylesheet for Swagger?
Let's assume I want to change the following style, which changes the header
background color to #704C8F.
1. CSS file
.swagger-section #header {
    background-color: #704C8F;
    padding: 14px;
}
2. SwaggerConfig
.EnableSwaggerUi(c =>                   {
c.InjectStylesheet(Assembly.GetAssembly(typeof(WebApiApplication)), "WebApplication2.styles.swagger_test.css");
3. Global.ascx
How the WebApiApplication looks like
The SwaggerConfig's InjectStylesSheet's first parameter need to pass the
current application's assembly, the second parameter is a little tricky. The
filename WebApplication2.styles.swagger_test.cssis
Project Folder name.{folder name} and the file name.
namespace WebApplication2
{
    public class WebApiApplication : System.Web.HttpApplication
    {
        protected void Application_Start()
        {
            AreaRegistration.RegisterAllAreas();
            GlobalConfiguration.Configure(WebApiConfig.Register);
            RouteConfig.RegisterRoutes(RouteTable.Routes);
        }
    }
}
4. styles file location
Also, this is very important, you have made the file BuildAction an Embedded Resource.
4. After 1 - 4 steps, how the page looks like

Can I add my own Javascript file to Swagger API documents?
You are able to do it as follows, assume you have a javascript file like this.
1. Javascript
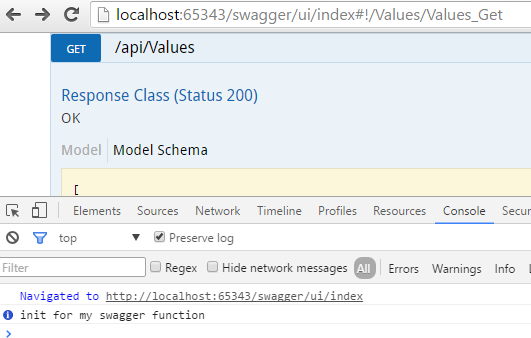
(function () {
    function init() {

        console.info("init for my swagger function");

        $("#explore").click(function () {
            alert("you clicked explore");
        });
    }

    init();
})();
2. Javascript file location and Build Action Property
3. SwaggerConfig class
set the javascript path as string type like following.
   var myAssembly = Assembly.GetAssembly(typeof(WebApiApplication));
   c.InjectJavaScript(myAssembly, "WebApplication2.js.swagger_test.js");
4. Done, check the page
When the page load, you can see the javascript console message, now you can add javascript to the page, my next question is can I change the default Html?
Now, we know we can change javascript, CSS, can we change the entire HTML?
Yes, and the main feature will still work if you use the swagger's existing javascript. Following is how we can do it.
1. Html Files
This time I want to add two HTML, after creating these HTML you also have to change Build Action as Embedded Resource again.

swagger_test.html
<h3>Bomm!!!!</h3>
OtherVersion.html
<!DOCTYPE html>
<html>
<head>
<meta charset="UTF-8">
<title>Swagger UI My Own Version</title>
<link rel="icon" type="image/png" href="images/favicon-32x32-png" sizes="32x32" />
<link rel="icon" type="image/png" href="images/favicon-16x16-png" sizes="16x16" />
<link href='css/typography-css' media='screen' rel='stylesheet' type='text/css' />
<link href='css/reset-css&#
39; media='screen' rel='stylesheet' type='text/css' />
<link href='css/screen-css' media='screen' rel='stylesheet' type='text/css' />
<link href='css/reset-css' media='print' rel='stylesheet' type='text/css' />
<link href='css/print-css' media='print' rel='stylesheet' type='text/css' />
<link href='ext/WebApplication2-styles-swagger_test-css' media='screen' rel='stylesheet' type='text/css' />
<script src='lib/jquery-1-8-0-min-js' type='text/javascript'></script>
<script src='lib/jquery-slideto-min-js' type='text/javascript'></script>
<script src='lib/jquery-wiggle-min-js' type='text/javascript'></script>
<script src='lib/jquery-ba-bbq-min-js' type='text/javascript'></script>
<script src='lib/handlebars-2-0-0-js' type='text/javascript'></script>
<script src='lib/underscore-min-js' type='text/javascript'></script>
<script src='lib/backbone-min-js' type='text/javascript'></script>
<script src='swagger-ui-min-js' type='text/javascript'></script>
<script src='lib/highlight-7-3-pack-js' type='text/javascript'></script>
<script src='lib/jsoneditor-min-js' type='text/javascript'></script>
<script src='lib/marked-js' type='text/javascript'></script>
<script src='lib/swagger-oauth-js' type='text/javascript'></script>
<!-- Some basic translations -->
<!-- <script src='lang/translator.js' type='text/javascript'></script> -->
<!-- <script src='lang/ru.js' type='text/javascript'></script> -->
<!-- <script src='lang/en.js' type='text/javascript'></script> -->
<script type="text/javascript">
$(function () {
var url = window.location.search.match(/url=([^&]+)/);
if (url && url.length > 1) {
url = decodeURIComponent(url[1]);
} else {
url = "http://petstore.swagger.io/v2/swagger.json";
}
// Get Swashbuckle config into JavaScript
function arrayFrom(configString) {
return (configString !== "") ? configString.split('|') : [];
}
function stringOrNullFrom(configString) {
return (configString !== "null") ? configString : null;
}
window.swashbuckleConfig = {
rootUrl: 'http://localhost:65343',
discoveryPaths: arrayFrom('swagger/docs/v1'),
booleanValues: arrayFrom('true|false'),
validatorUrl: stringOrNullFrom('http://localhost:65343/validator'),
customScripts: arrayFrom('ext/WebApplication2-js-swagger_test-js'),
docExpansion: 'none',
oAuth2Enabled: ('false' == 'true'),
oAuth2ClientId: '',
oAuth2ClientSecret: '',
oAuth2Realm: '',
oAuth2AppName: '',
oAuth2ScopeSeperator: ' ',
oAuth2AdditionalQueryStringParams: JSON.parse('{}')
};
// Pre load translate...
if(window.SwaggerTranslator) {
window.SwaggerTranslator.translate();
}
window.swaggerUi = new SwaggerUi({
url: swashbuckleConfig.rootUrl + "/" + swashbuckleConfig.discoveryPaths[0],
dom_id: "swagger-ui-container",
booleanValues: swashbuckleConfig.booleanValues,
onComplete: function(swaggerApi, swaggerUi){
if (typeof initOAuth == "function" && swashbuckleConfig.oAuth2Enabled) {
initOAuth({
clientId: swashbuckleConfig.oAuth2ClientId,
clientSecret: swashbuckleConfig.oAuth2ClientSecret,
realm: swashbuckleConfig.oAuth2Realm,
appName: swashbuckleConfig.oAuth2AppName,
scopeSeparator: swashbuckleConfig.oAuth2ScopeSeperator,
additionalQueryStringParams: swashbuckleConfig.oAuth2AdditionalQueryStringParams
});
}
if(window.SwaggerTranslator) {
window.SwaggerTranslator.translate();
}
$('pre code').each(function(i, e) {
hljs.highlightBlock(e)
});
addApiKeyAuthorization();
window.swaggerApi = swaggerApi;
_.each(swashbuckleConfig.customScripts, function (script) {
$.getScript(script);
});
},
onFailure: function(data) {
log("Unable to Load SwaggerUI");
},
docExpansion: swashbuckleConfig.docExpansion,
jsonEditor: false,
apisSorter: null, // default to server
defaultModelRendering: 'schema',
showRequestHeaders: false
});
if (window.swashbuckleConfig.validatorUrl !== '')
window.swaggerUi.options.validatorUrl = window.swashbuckleConfig.validatorUrl;
function addApiKeyAuthorization(){
var key = encodeURIComponent($('#input_apiKey')[0].value);
if (key && key.trim() != "") {
var apiKeyAuth = new SwaggerClient.ApiKeyAuthorization("api_key", key, "query");
window.swaggerUi.api.clientAuthorizations.add("api_key", apiKeyAuth);
log("added key " + key);
}
}
$('#input_apiKey').change(addApiKeyAuthorization);
// if you have an apiKey you would like to pre-populate on the page for demonstration purposes...
/*
var apiKey = "myApiKeyXXXX123456789";
$('#input_apiKey').val(apiKey);
*/
window.swaggerUi.load();
function log() {
if ('console' in window) {
console.log.apply(console, arguments);
}
}
});
</script>
</head>
<body class="swagger-section">
<h1>Damn, I love this! Swagger!</h1>
<div id="message-bar" class="swagger-ui-wrap" data-sw-translate> </div>
<div id="swagger-ui-container" class="swagger-ui-wrap"></div>
</body>
</html>
2. SwaggerConfig for Html
      c.CustomAsset("swagger_test", myAssembly, "WebApplication2.html.swagger_test.html");
                        c.CustomAsset("OtherVersion", myAssembly, "WebApplication2.html.OtherVersion.html");
3. That's it, let's check the browser.
Now, you're going to ask a question, what's the URL. I didn't figure it out at
the first, but look like Swagger is using the file name as the URL. Since
their default page is /swagger/ui/index, so my new files' URL will be
/swagger/ui/OtherVersion and
/swagger/ui/swagger_test
Following is one of my new pages, OtherVersion. Isn't this so sweet? As a developer when you use other UI Framework if you can replace CSS, Javascript and HTML but keep their original logic. That's just fantastic.

Add .NET XML comment for swagger's API description
ASP.NET WebAPI's default API helper document also looks for DLL's XML comment for description. We can do that in swagger too.
1. Project property
The first thing you need to do is go to the project that contains the API controller to check the XML documentation file, so when building the solution visual studio will update the XML with comments you add to the class. Also, swagger later will read the XML's comment as a description of the API too.

2. SwaggerConfig setting
The next important thing is, swagger has not registered the API XML, you can add it as follows.
c.IncludeXmlComments(string.Format(@"{0}\bin\APIDemo.XML", System.AppDomain.CurrentDomain.BaseDirectory));
Following are examples of the WebAPI controller and the API Model class' XML document.
/// <summary>
    /// my product
    /// </summary>
    public class Product
    {
        /// <summary>
        /// product id
        /// </summary>
        public Guid GuidId { get; set; }
        /// <summary>
        /// product Id
        /// </summary>
        public int ProductId { get; set; }
        /// <summary>
        /// product name
        /// </summary>
        public string ProductName { get; set; }
        /// <summary>
        /// product price
        /// </summary>
        public decimal Price { get; set; }
        /// <summary>
        /// product unit
        /// </summary>
        public int Unit { get; set; }
/// <summary>
    /// ProductController API
    /// </summary>
    public class ProductController : ApiController
    {
        /// <summary>
        /// products data
        /// </summary>
        public static List<Product> Products
        {
            get
            {
                return new List<Product>
                {
                    new Product(Guid.NewGuid(), 122, "Product A", 300, 1),
                    new Product(Guid.NewGuid(), 333, "Product B", 400, 10),
                    new Product(Guid.NewGuid(), 444, "Product C", 500, 20),
                    new Product(Guid.NewGuid(), 555, "Product D", 600, 15),
                    new Product(Guid.NewGuid(), 777, "Product E", 700, 5)
                };
            }
        }

        /// <summary>
        ///  get values for products
        /// </summary>
        /// <returns></returns>
        public IEnumerable<Product> Get()
        {
            return Products;
        }
3. Done! Let's browser the API Document
Now, we're done, after building the solution, you should see your XML comment add to the Csharp class at the Swagger API documentation page.

Conclusion
Swagger with ASP.NET MVC will provide very powerful API documentation and it is very flexible.
Check the Code mentioned in this blog.